It is assumed that the following softwares are installed. If the installation path is different, please read as appropriate.
|
When you use Visual Studio 2017 Professional/Community, "Desktop Development with C++" ->"Windows 8.1 SDK and UCRT SDK" option needed |
| Executable file path | C:\opencv\bin | <-- Add this path to the Path of the environment variable. |
| Include file path | C:\opencv\include | |
| Library path | C:\opencv\lib |
| Include file path | $(KINECTSDK20_DIR)inc | |
| Library path | $(KINECTSDK20_DIR)Lib\x64 |
[Notice] If you use the official SDK published by Microsoft, you can use Kinect V2 in Python, and i think it may be more common. Here, from the technical point of view, I will describe the method of creating a DLL that uses Kinect V2 by myself and using it in Python.
Copy all the files under the folder "$(KINECTSDK20_DIR)Redist\Face\x64\".
[NOTICE] $(KINECTSDK20_DIR) is set to "C:\Program Files\Microsoft SDKs\Kinect\v2.0_1409\" in my environment. Please change according to your own environment.
copy all the files under the "$(KINECTSDK20_DIR)Redist\VGB\x64\".
[NOTICE] $(KINECTSDK20_DIR) is set to "C:\Program Files\Microsoft SDKs\Kinect\v2.0_1409\" in my environment. Please change according to your own environment.
Download the latest NtKinect.py and place the working directory.
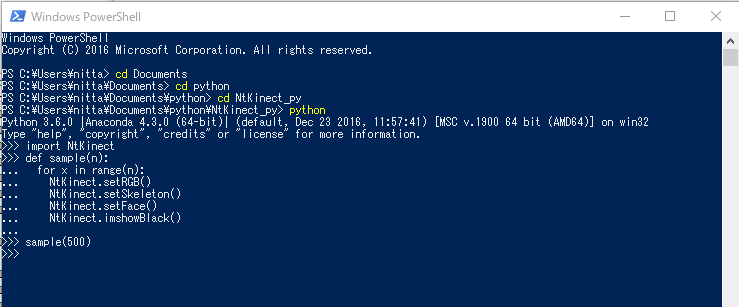
import NtKinect
def sample(n):
for x in range(n):
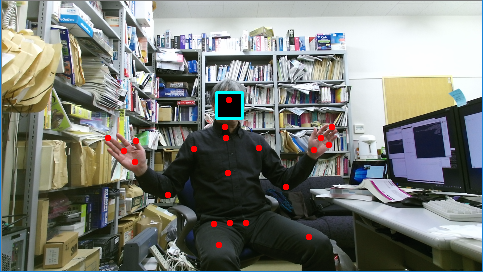
NtKinect.setRGB()
NtKinect.setSkeleton()
NtKinect.setFace()
NtKinect.imshowBlack()
sample(500)
|
Since the above zip file may not include the latest "NtKinectDLL.dll" and "NtKinect.py", Download the latest version from here and replace old one with it.